Sizing a leather patch is a placement decision first and an artwork decision second. A patch that looks balanced on a structured trucker cap can overwhelm a soft dad hat, and a design that reads cleanly at 3.5 inches can turn into an unreadable smudge of debossed lines at 2. Because leather carries detail through depth rather than stitch count, the relationship between size, panel, and legibility matters more here than it does with embroidery. This guide walks through the dimensions that actually work by application, the thickness ranges behind them, and the checks worth running before you approve a proof.
Start with the panel, not the patch
The usable width of almost any leather patch is set by the surface it sits on, not by the logo. A cap front panel, a jacket chest, and a tote face each impose their own ceiling, and the smartest way to size a patch is to work down from that ceiling rather than up from your artwork. The ranges below reflect what most patch makers recommend across common placements. Treat them as starting points: a busy logo with fine text usually wants the upper end of a range, while a simple monogram can live comfortably at the lower end.
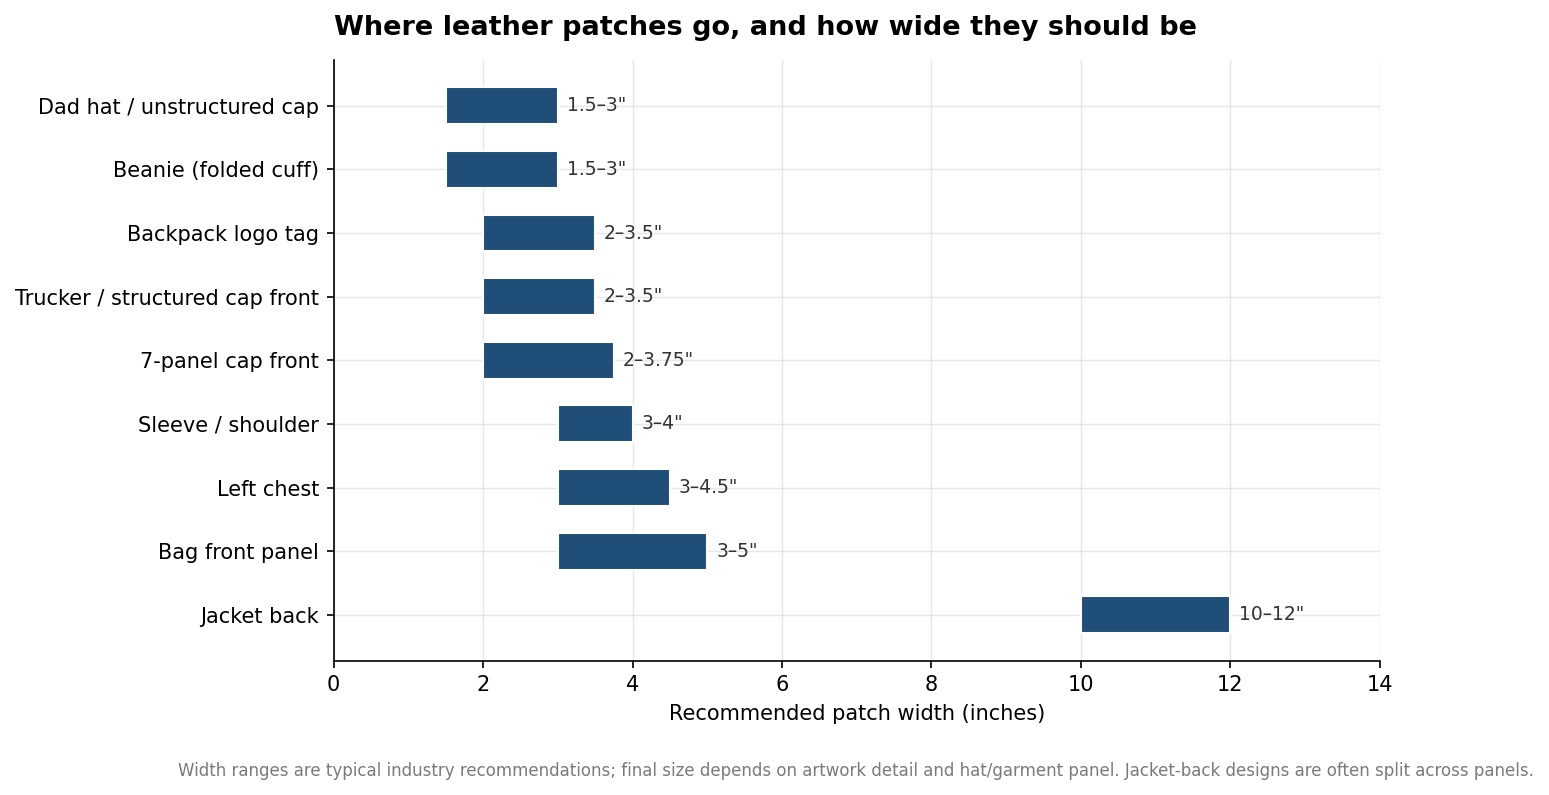
Hats are the tightest constraint, which is why they drive so many size decisions. On a structured trucker or snapback, a front-panel patch typically runs 2 to 3.5 inches wide by 1 to 2.5 inches tall, with a 2.25-inch circle being one of the most common footprints. Softer dad hats and unstructured caps look better with something smaller, in the 1.5 to 3 inch range, because an oversized patch fights the slouch of the panel. Beanies follow the same 1.5 to 3 inch guidance and are almost always placed on the folded cuff so the patch stays flat. Seven-panel caps give you a touch more room, up to roughly 3.75 inches, but the seams still limit how wide you can go before the patch crosses a panel line.
Dimensions for apparel and bags
Apparel opens up quickly once you move off the head. A left-chest patch on a jacket, pullover, or work shirt generally lands between 3 and 4.5 inches wide, which is large enough to carry a wordmark without dominating the garment. Sleeve and shoulder placements sit in a similar 3 to 4 inch band. Full jacket-back patches are a different animal entirely, running 10 to 12 inches or more; at that scale, leather is often applied as one large panel or split into sections, and it is worth confirming the maximum single-piece size a supplier can cut and press before committing to a back design.
Bags and packs behave like small billboards. A discreet logo tag on a backpack or dopp kit usually falls in the 2 to 3.5 inch range, while a front-panel statement patch on a tote or duffel can stretch to 3 to 5 inches. Because bag panels are often stiffer and flatter than garment fabric, they tolerate larger rectangles well, and a heat-sealed or stitched leather patch tends to sit cleanly without the puckering you sometimes see on thin apparel.
How thickness and the size formula work together
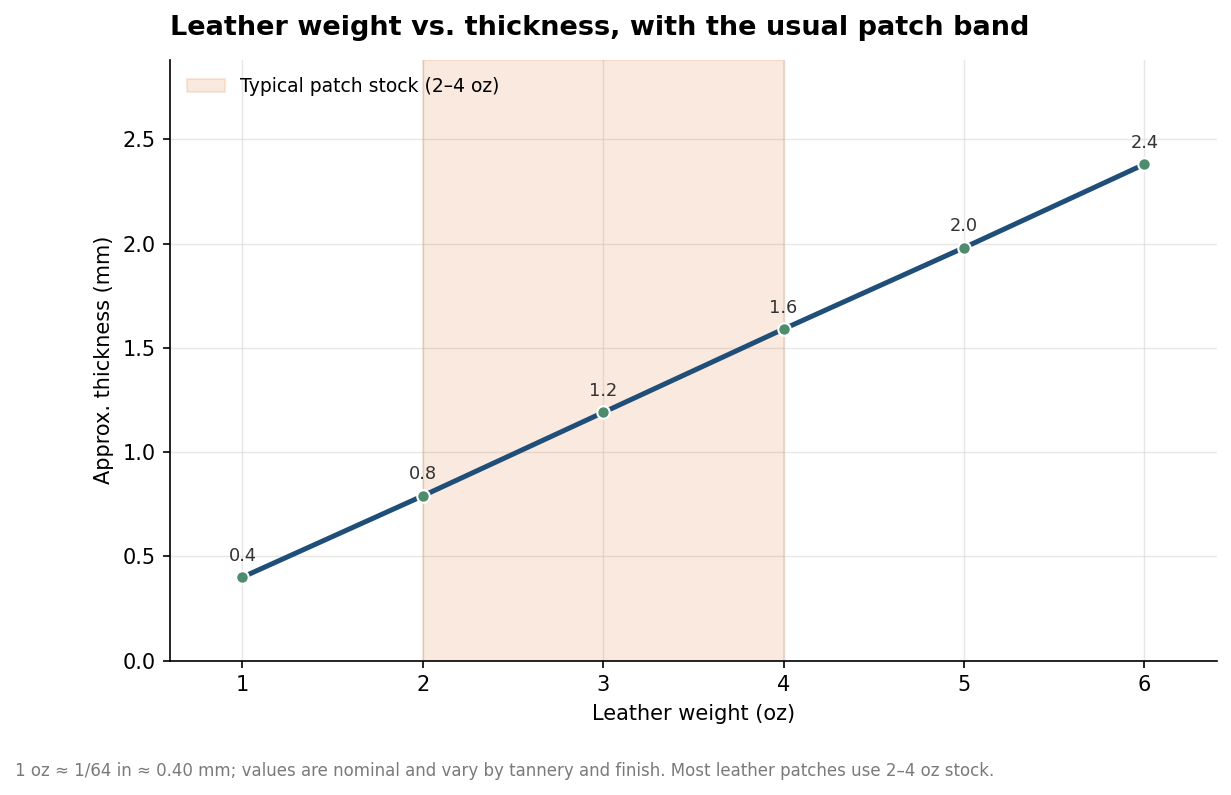
Two numbers quietly shape every leather patch: its weight and its overall size. Leather thickness is measured in ounces, where one ounce equals about 1/64 inch, or roughly 0.4 millimeters. Most patches are cut from 2 to 4 ounce stock, which lands between 0.8 and 1.6 millimeters, thick enough to hold a crisp debossed edge and thin enough to flex with a cap panel. Going heavier improves the hand-feel and the depth of the impression but makes the patch stiffer, which is the wrong trade on a soft hat and the right one on a rigid bag. These weight-to-thickness figures are nominal; actual caliper varies by tannery and finish.
For overall size, the industry shorthand is simple: patch size equals height plus width divided by two, averaged across the design regardless of shape. That average is what determines legibility. As a rule of thumb, the smallest readable text on a patch is around a quarter inch tall, which usually means any design carrying words needs an overall size near 3 inches to stay clean. Leather is more forgiving than embroidery for solid shapes, but fine serifs, thin outlines, and small registration marks still disappear fast below that threshold. If your logo only exists as a detailed full-color mark, plan to simplify it for leather rather than shrinking it.
Checks worth running before you approve a proof
Confirm the imprint area, not just the cut size. A patch listed as 3 by 2 inches often has a usable imprint window closer to 2.75 by 1.75 inches once you account for the border, so the artwork has less room than the outer dimension suggests. Ask for that live area and design inside it. It also helps to print the proof at 100 percent scale on paper and hold it against the actual hat or garment; a size that looks right on screen frequently reads differently at arm’s length on a curved panel.
Match the attachment to the placement. Heat-seal backing is fast and clean on flat, heat-tolerant surfaces and is commonly applied around 270 to 285 degrees Fahrenheit for 10 to 15 seconds with light to medium pressure, though exact settings vary by backing and base material. Curved or high-flex spots, and any garment you expect to wash hard, usually do better with stitching. Sizing and attachment are linked decisions: a large patch on a flexible panel needs the security of a sewn edge more than a small logo tag does.
Get the placement, the thickness, and the live area right and the size almost chooses itself. Start from the panel, respect the roughly 3-inch legibility floor for anything with text, and proof at full scale before committing. The difference between a patch that looks intentional and one that looks bolted on is usually a half inch and a printed test.