A custom leather patch looks simple on a hat or jacket, but the order form asks you to make half a dozen decisions that all affect how the finished piece looks and holds up. Leather type, decoration method, size, backing, and quantity each pull in different directions, and getting one wrong usually means a reprint. This walkthrough takes those choices in the order a supplier will ask about them, with the numbers you need to answer confidently.
It helps to know what other buyers are actually after, because it tells you which options a supplier has tooled up to produce cheaply. Demand clusters heavily around a handful of terms.
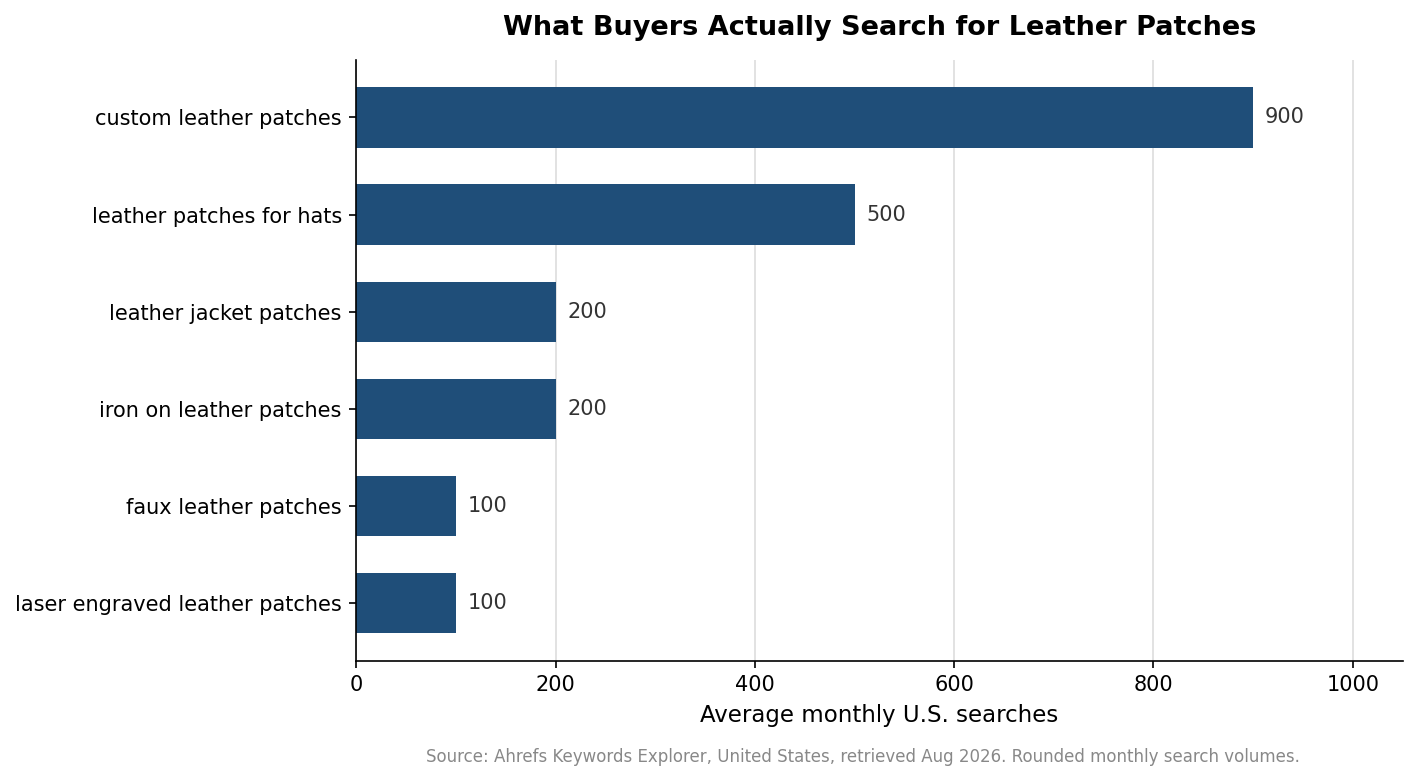
Start with the leather, because it limits everything else
The material decides which decoration methods are open to you, so pin it down first. Full-grain and vegetable-tanned leather take the crispest impressions and are the default for pressed designs. Top-grain is a lighter, more uniform cut that still presses well. “Genuine leather” is a lower grade made from split hides and behaves inconsistently under a die. Faux or PU (vegan) leather is a coated fabric that laser-etches and debosses predictably, costs less, and avoids the natural color variation of real hide, which matters if you need 500 patches to match.
Thickness is the specification people forget. For a clean debossed or embossed result you want leather of at least 1.2 mm; thinner stock flattens out and loses the edge of the impression. If your supplier lists weight in ounces rather than millimeters, roughly 3 to 4 ounces lands in that usable range. Ask what they stock before you commit to a method that needs thicker material than they carry.
Match the decoration method to the look you want
Debossing presses the design into the surface with a heated or cold metal die, leaving a recessed mark typically 0.2 to 0.6 mm deep. It holds fine detail down to about a 0.2 mm line width, which makes it the right pick for thin fonts, monograms, and detailed logos. Because the mark sits below the wear surface, it also resists rubbing better than a raised design and can be re-pressed with the original die if it ever softens.
Embossing does the opposite, raising the design above the surface between a matched pair of molds. It reads best with bold logos, geometric shapes, and heavy sans-serif type. The tradeoff is durability: raised areas are the first thing to flatten under friction, so embossing suits display pieces and premium packaging more than a jacket that gets worn hard. Laser engraving takes a third route, etching the top layer to create contrast rather than depth. It handles intricate artwork, works on both genuine and faux leather, and usually carries no die or setup fee, which is why it dominates short runs. Foil stamping adds a metallic or colored fill on top of any of these if you need the mark to pop in a specific color.
Lock in size and artwork before you fall in love with a design
Patches are small, and detail that reads on your monitor disappears at scale. Common placements set the ceiling: a baseball cap front takes a patch up to about 4 inches wide by 2.75 inches tall, though most sit closer to 2.5 to 3.5 inches wide; a jacket chest hit runs around 2.5 by 2.5 inches; a full jacket back can go up to roughly 10 by 14 inches. Many suppliers price by the average of the patch’s width and height, so a 3-by-2-inch patch is quoted as a 2.5-inch size. Design at the real dimensions, print a paper proof at 100 percent, and cut anything that turns into mush at that size. Supply artwork as vector files (AI, PDF, SVG, or EPS); if you only have raster art, it needs to be 300 DPI or higher at the finished size.
Backing and border decide how it attaches and wears
The backing is a functional choice, not a formality. A sew-on or no-backing patch is the permanent option and the right call for uniforms and anything that goes through the wash repeatedly. Iron-on, sometimes called heat seal, is semi-permanent and convenient, but it deserves a caution on genuine leather: the heat and adhesive bond far more reliably to faux or fabric-backed leather than to a thick natural hide, so confirm your material and backing are compatible rather than assuming. Peel-and-stick adhesive is a temporary fix for events and samples, and hook-and-loop (Velcro) lets the wearer swap patches, which is why tactical and team gear uses it.
The border shapes the edge and the overall impression. A merrowed border wraps the edge in stitching for a classic finish, a laser-cut border gives a clean modern edge that follows any shape, and an embroidered border blends the patch into stitched garments. Choosing “no border” is fine for a raw-edge leather look, but understand it exposes the cut edge to fraying on softer materials.
Set quantity and lead time against your real deadline
Minimums and timelines vary more than any other part of the order. Some shops start at 20 pieces, many at 50, and a few advertise no minimum at all, usually at a higher per-unit price. Pricing is quote-based and drops as quantity climbs; pressed methods like debossing and embossing often add a one-time die or setup fee that laser engraving avoids, so for a run of 25 the laser route can win on total cost even if the per-piece rate looks similar.
Build your calendar around the fact that these stages run in sequence. A small sample order can ship in 4 to 7 days, but a standard production run typically takes about 2 to 3 weeks after you approve artwork, and rush service is a separate paid tier.
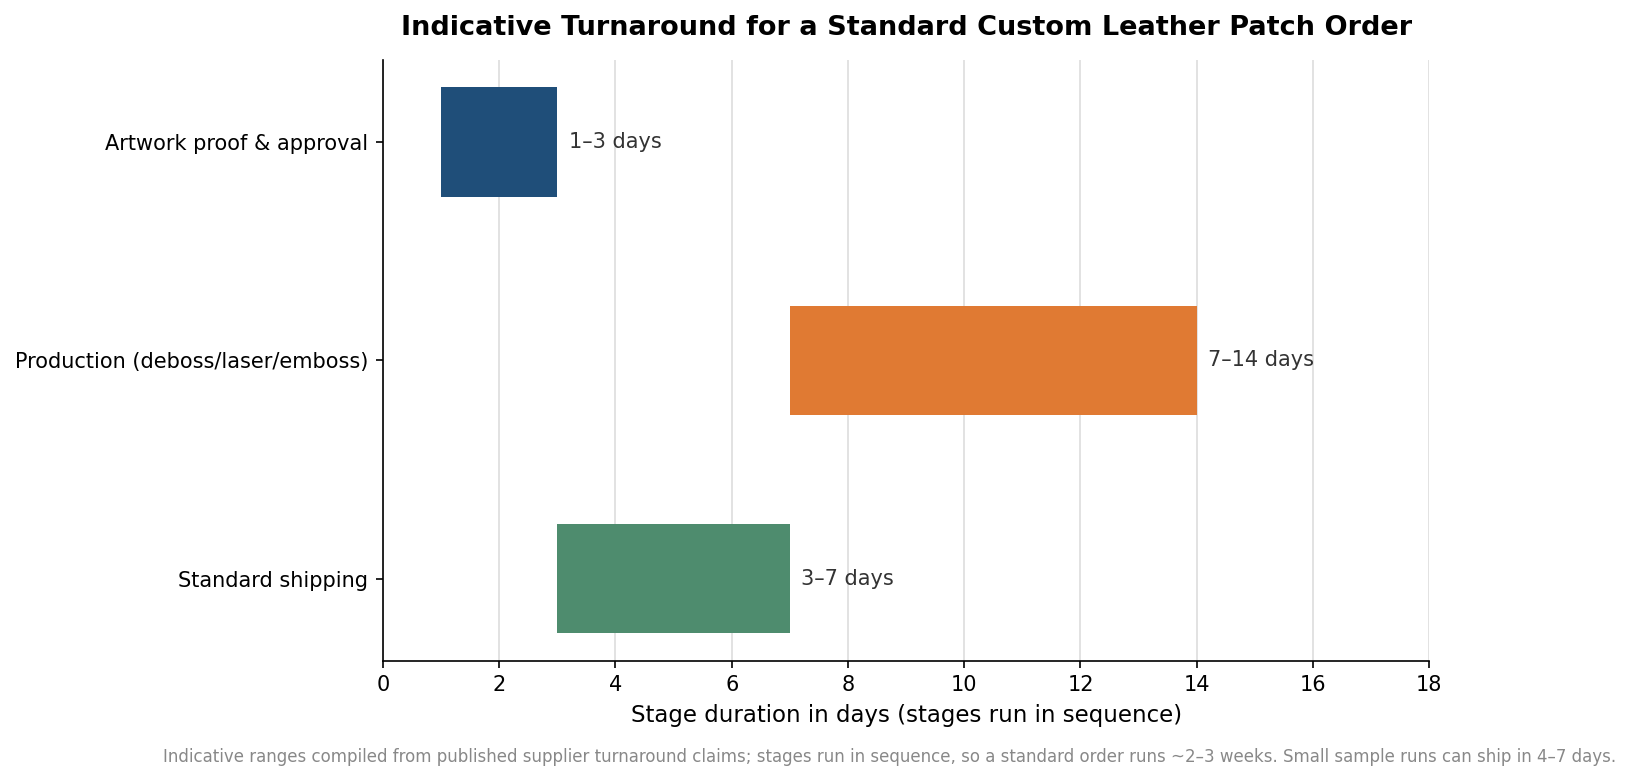
Work through those five decisions in order and the quote you get back will match what shows up in the box. The expensive mistakes almost always come from skipping one step, specifying a pressed design on thin leather, or ordering an iron-on backing for a hide it will not stick to, so slow down where the material and the method meet.